How Directories Can Use the Screenshot API to Generate Featured Images for Their New Listings

Learn how to use CaptureKit Screenshot API to generate featured images for their new listings.
Running a directory or thinking about starting one? Staring at rows of plain text listings gets boring pretty quickly.
Directory listings need featured images for the listed businesses, and what better way to automate them than using a screenshot API?
So, if you are a business that either asks your customers to upload a featured image for their product or you do it yourself when someone registers on your platform, well, there’s good news.
With a Screenshot API like Capturekit, every listing shows up with a real, up-to-date preview without requiring any manual work.
This blog explains how directories can use Screenshot APIs to create featured images with less effort, so you can spend more time building and improving your platform.
Let’s get started.
How to Automate Screenshot Generation for Directory Listings Using CaptureKit
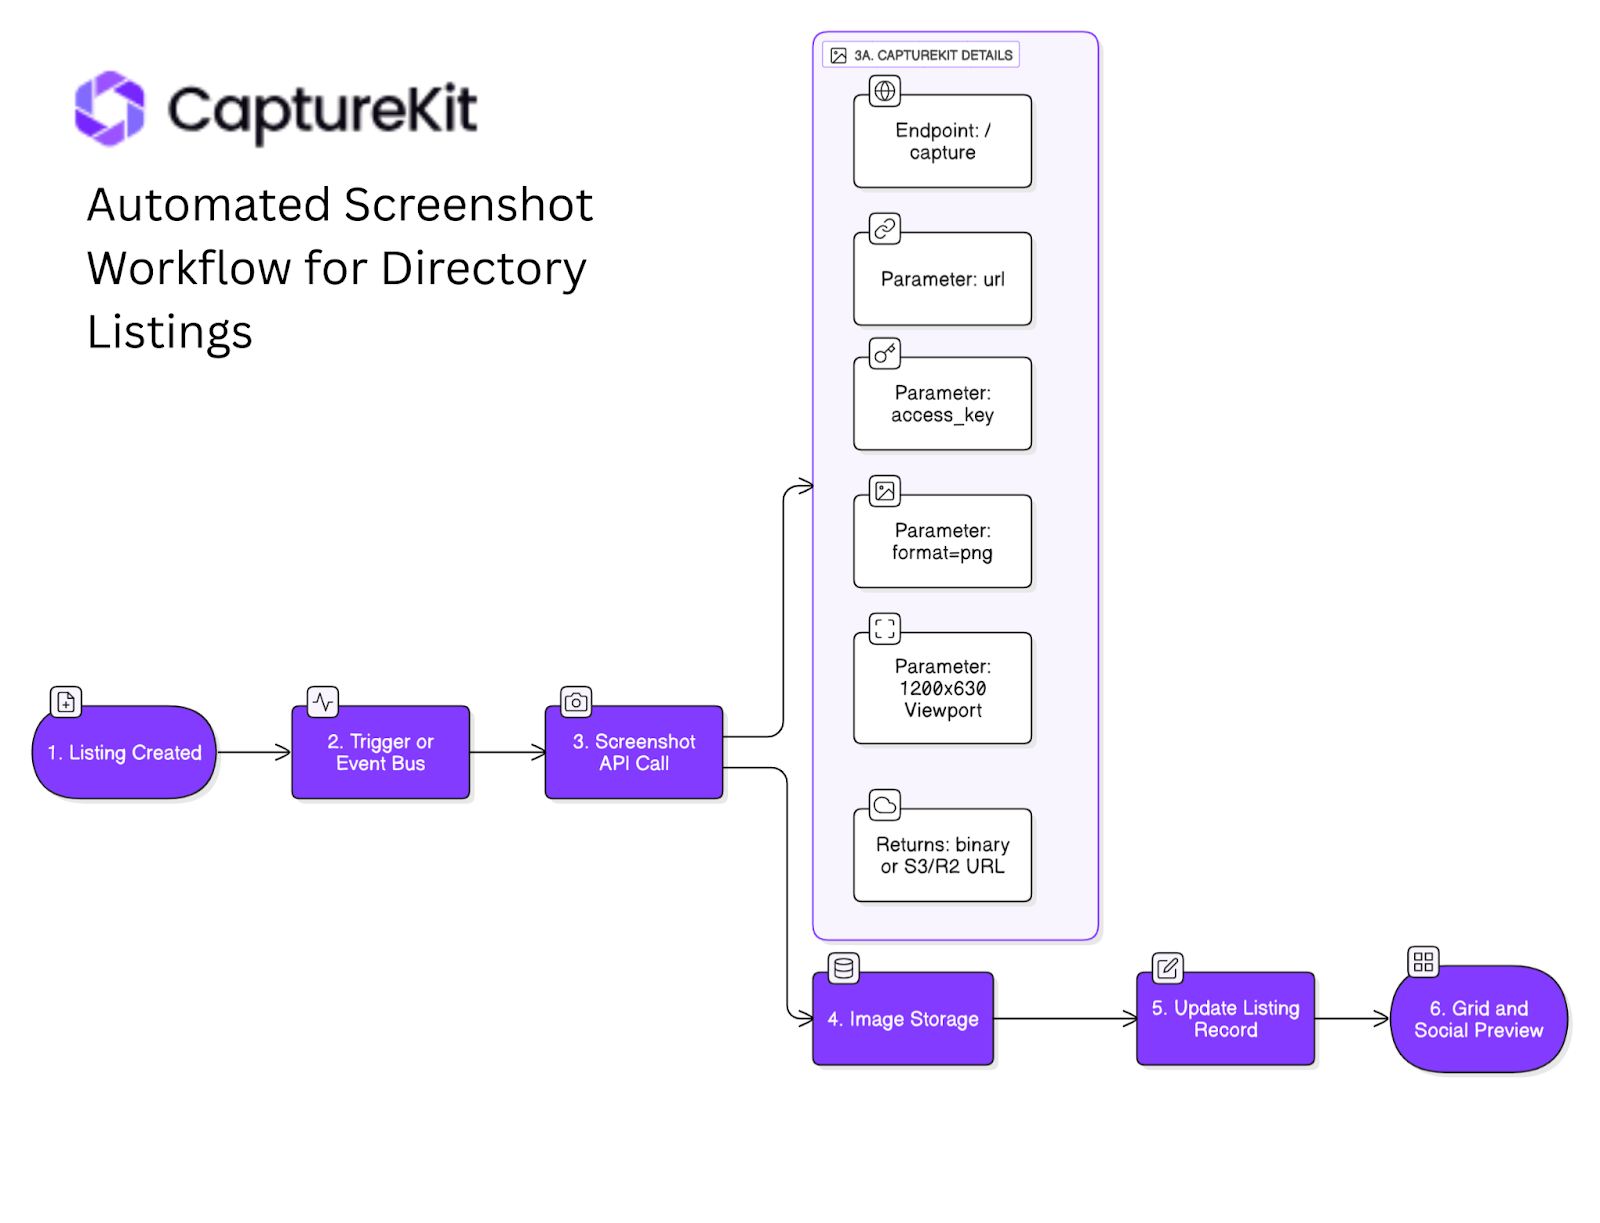
This section breaks down exactly how the screenshot automation works from the moment a new listing is created to when a preview image is available for your grid or social cards.
Once you understand the flow, you can set this up however you prefer, whether you’re a developer wiring it through code or a no-coder using tools like Make.com or Zapier. The workflow is flexible enough to support both.
Step-by-Step Breakdown of How Directories Can Implement Screenshot API
1. Listing Created
Whenever a new listing is published in your directory CMS, this event becomes your trigger point. At this stage, the only thing you need is the public URL of the listing.
2. Trigger / Event Bus
Your CMS (like a custom backend, WordPress, or Airtable) emits an event such as listing.created or listing.updated. This event should carry the listing’s public URL, which will later be passed into the screenshot API.
This event could be handled by a webhook, a queue like Supabase Edge Functions, or any automation platform like Make.com or Zapier.
3. Screenshot API Call
Before you build your automation, it’s a good idea to understand how the screenshot will look.
👉 You can sign up at CaptureKit and use the Playground to test your screenshots visually. Just enter your listing URL, adjust the parameters like device, resolution, or format, and it’ll generate a preview along with the exact API call URL you can later plug into your automation tool or code.
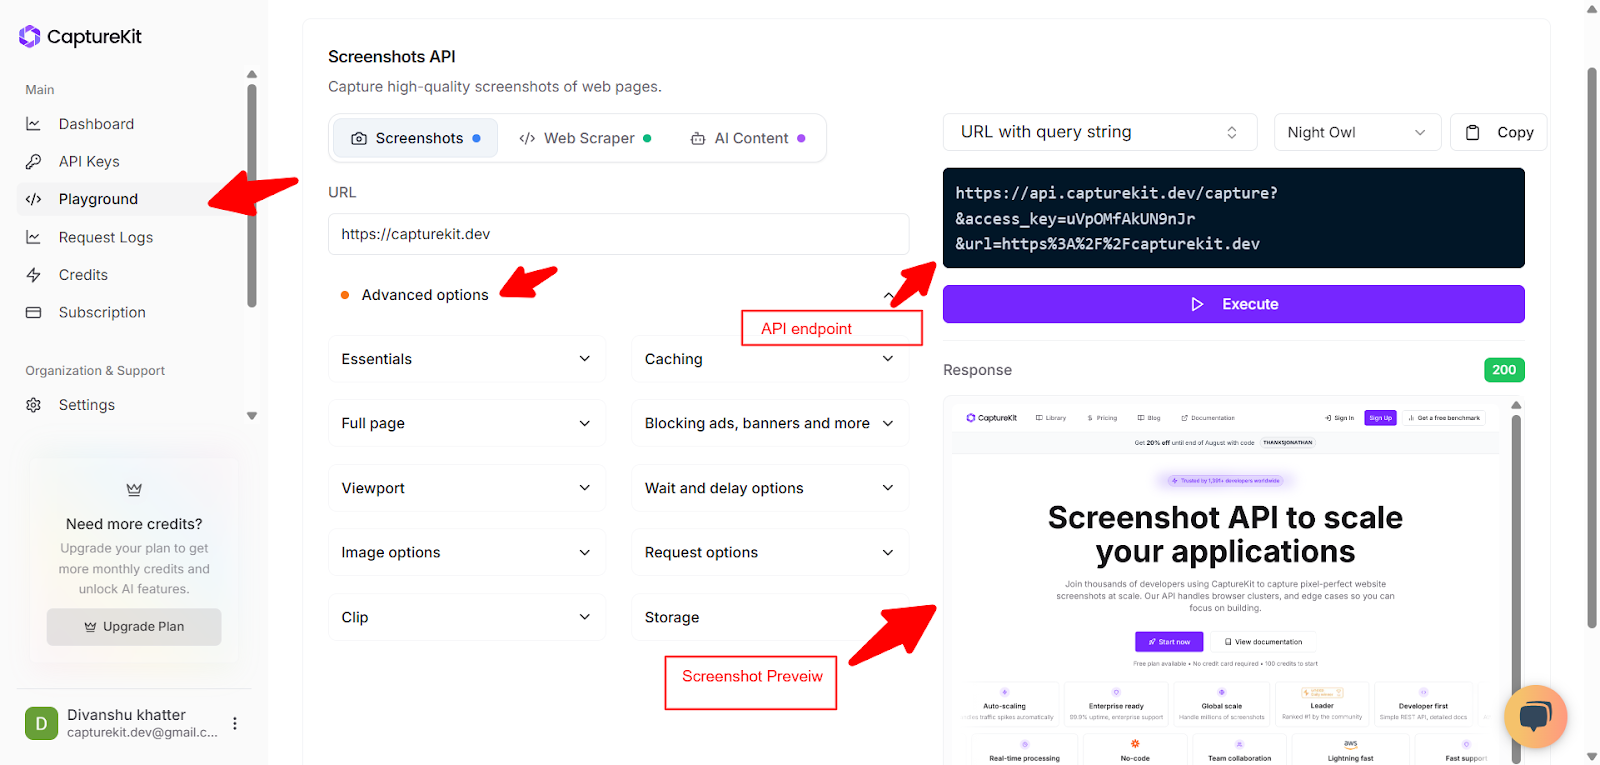
Once you’re ready, you make a simple GET request to the CaptureKit API:
https://api.capturekit.dev/v1/capture
Minimum required parameters:
- x_api_key=<your_api_key>
- url=<listing_url>
- viewport_width=1200
- viewport_height=630
- format=png
Optional parameters:
device=iphone_14_pro(for a mobile-sized preview)s3_url=trueand related AWS credentials (s3_bucket,s3_key, etc.) for direct uploadhide_selector,wait_for, ordelayif you want more control over rendering
The API returns either:
- A raw image (PNG or JPEG)
- Or a pre-signed S3 / Cloudflare R2 URL (if you used direct-upload options)
To get more information on how CaptureKit API works, 👉 read the documentation.
4. Image Storage
Once you receive the screenshot, store it. You can:
- Save it as a media asset in your CMS
- Upload it to your own S3 bucket or Cloudflare R2
- Proxy it through your CDN if you want faster loads and custom domains
The output is a permanent URL that points to the image.
5. Update Listing Record
Now that you have the image, update the listing’s CMS record:
- Set the
thumbnail_urlfield for grid views - Set
og:imagefor better link previews on Twitter, LinkedIn, and Facebook
This step can be automated using the CMS API or database patching.
6. Grid & Social Preview
The listings will be live and complete with a crisp featured image generated automatically. Your directory grid can show these thumbnails, and when a user shares the listing, platforms like Twitter/X, Facebook, and LinkedIn pull this image as a rich media card.
Optional Extensions You Can Add to the Workflow
Once you’ve set up the core automation, you can take things further with these handy add-ons, depending on what your directory platform needs.
**Mobile + Desktop Variants:**If your listings are viewed across devices, you can make two separate API calls, one for a desktop-sized viewport and another for mobile.
**Scheduled Screenshot Refresh:**Want your listing previews to stay current even after the underlying webpage changes? Just create a nightly cron job or automation loop that re-captures screenshots for all listings. It’s especially helpful for active platforms where merchants often update their pages or redesign their sites.
Error Visibility & Monitoring: Sometimes pages break or go offline. To avoid invisible errors, you can log all failed screenshot requests (4XX or 5XX) directly to Slack, email, or another alerting system.
These extensions are totally optional, but they can seriously level up your directory management. Whether you’re building with code or using no-code tools, they’re easy to plug into your existing workflow.
Why This Matters for Directories
Instant polish for every listing: Each new entry can instantly feature a real, eye-catching visual. The whole directory looks active and professional from day one.
SEO and click-through boost using open-graph images: When listings get shared on Twitter, LinkedIn, Facebook, or in chat apps, those visuals drive more clicks and help listings stand out in search results.
Hands-off maintenance: Once the API pipeline is set up, the image updates happen by themselves. No babysitting required, even if new listings arrive by the thousands every week.
Future-proof flexibility: In future, maybe storage needs to move from S3 to Cloudflare, or mobile screenshots start to matter more. This can be easily done without touching the core CMS or breaking the workflow.
Consistent branding and trust: Automatic screenshots keep everything looking sharp and unified without any broken or missing images.
Wrapping Up
Screenshot automation for directories makes life a whole lot easier. With Capturekit, there’s no more wrestling with blank image slots or wasting time on manual uploads. The process is simple, and once it’s set up, every new listing gets an instant, polished preview.
Ready to put directory image management on autopilot? Sign up at CaptureKit & get 1000 free credits to test the API.
And if you need any help, you can always reach out to us on chat, and we would be happy to help.
Not sure where to begin with automation? Here are a few tutorials that walk through different ways to set up website screenshot workflows, step by step:
Ready to get started with CaptureKit?
Start capturing screenshots and extracting content today. Get started for free.
Get StartedYou Might Also Like
Automate Website Screenshots Using Make, Google Sheets & Screenshot API
Learn how to build a powerful automation workflow that captures screenshots of websites at scale using Make.com, Google Sheets, and CaptureKit's Screenshot API.
Automate Website Summaries at Scale from Any Domain Using CaptureKit and n8n
Automate website content summaries from any domain using CaptureKit and n8n. Save time, boost efficiency, and scale your data workflow easily.
How Screenshot API can be used with OpenAI-4o Image Generator
Learn how to use OpenAI-4o with CaptureKit Screenshot API to generate images.