How to Take Screenshots at Scale using Google App Script

Learn how to use CaptureKit Screenshot API to take screenshots at scale using Google App Script.
This guide is for anyone who needs fast, repeatable screenshots using only Google Sheets and CaptureKit Screenshot API.
You can watch the video version of this tutorial here :
You won’t need any code tools or coding skills. With a simple Google Apps Script, you can automate screenshots straight from your spreadsheet. I’ll walk you through it, step by step, and you’ll finish with a downloadable blueprint at the very end that you can use right away.
Let’s get started!
What will you need?
-
An account on CaptureKit (Sign up and you get 100 credits to test it out.)
-
A Google Sheet.
Step-by-Step Tutorial for Automation using Google App Script to Take Screenshots
If you’re building this automation from scratch, pay close attention to each step. One small slip and your setup could go sideways.
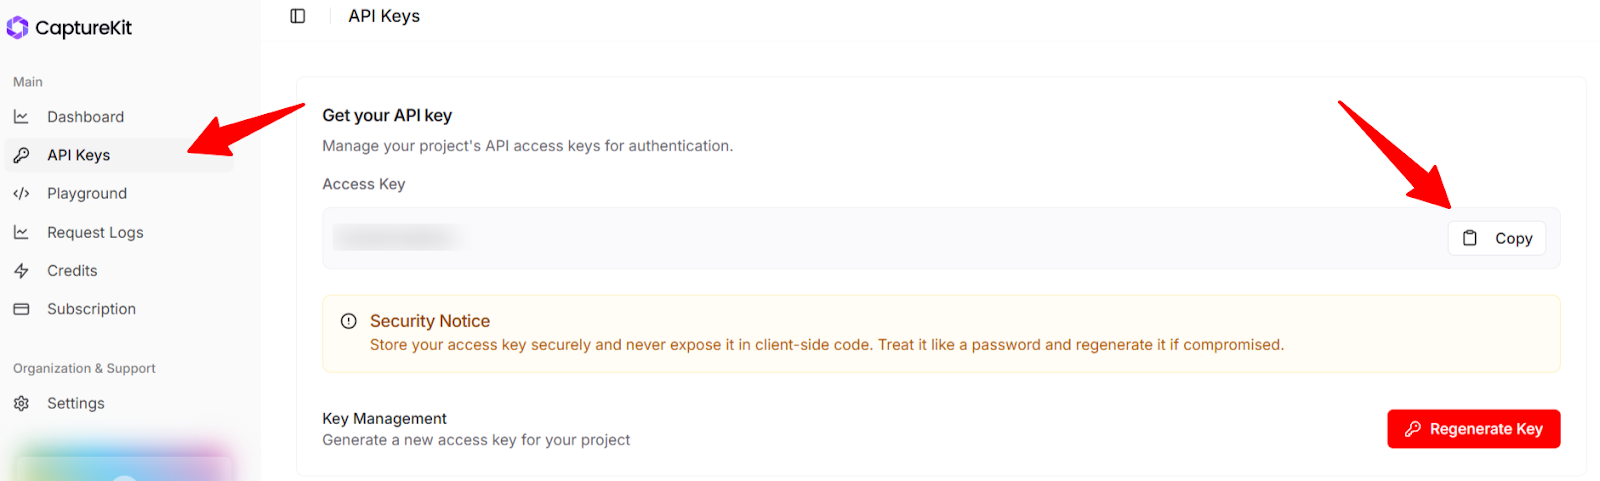
Step 1: Get Your Screenshot API Key
Once you’ve logged in to CaptureKit, you’ll land on your dashboard. Click on “API Keys” This is where you’ll spot your API key. You’ll need this for your Google Apps Script, so don’t lose it.
Just below this, you’ll find the playground. This is where you can tweak the API endpoint and test how your screenshot will look.

Note: Using Advanced Options, you can change the screenshot format, get device-specific screenshots, block cookie banners, or strip out ads. I’ve chosen the settings that give you a crisp, full-page screenshot, but you can adjust them if you like. If you decide to switch things up, you might need to update the script as well. If coding isn’t your thing, ChatGPT or other Generative AI tools can help you out, or you can just use the Apps Script I’ve shared and get going straight away.
Step 2: Set up Google Sheets
Open a new Google Sheet and give it a name. In column A, list all the URLs you want screenshots for. In column B, this is where your screenshots will show up.
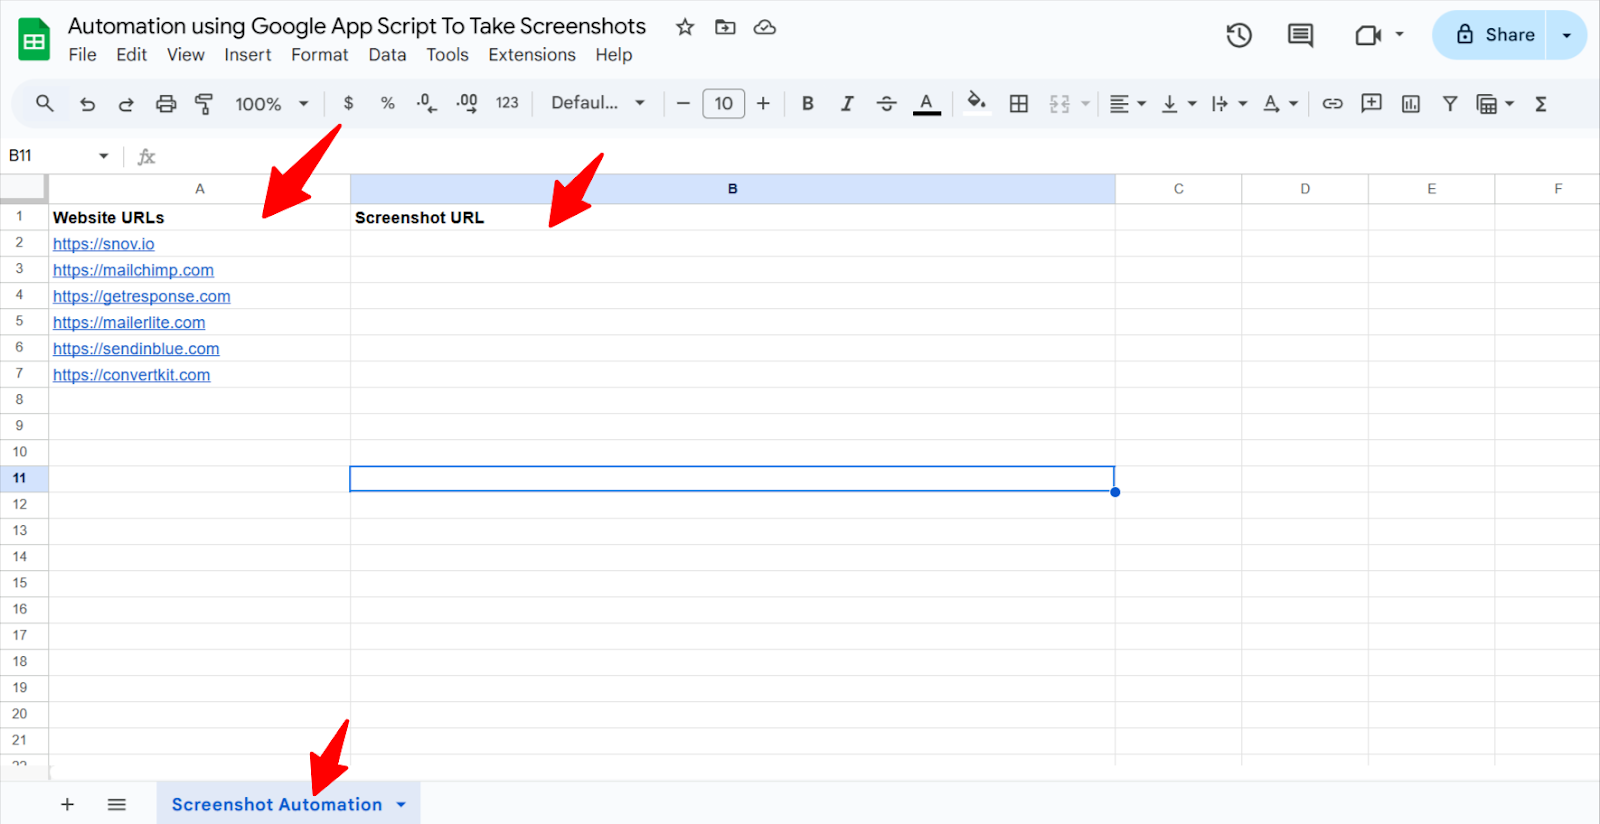
Stick with the same tab name I’ve used to keep things simple. If you want to use a different tab name, that’s fine, but you’ll need to update this in the Apps Script later on. I’ll show you exactly how to do that in the next step.
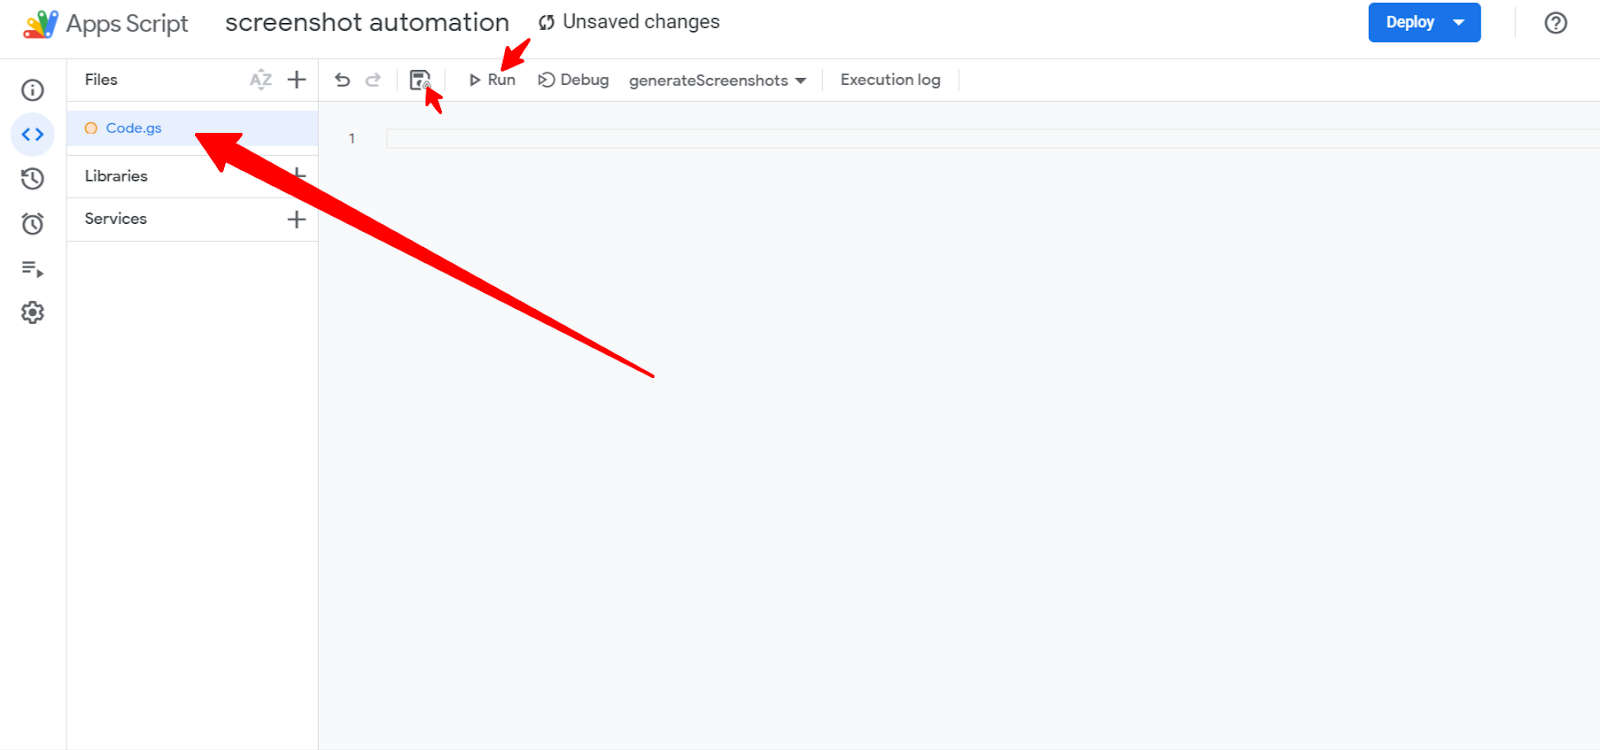
Step 3: Get started with AppScript
First, click on Extensions, then select Apps Script. You’ll land on a page called code.gs. This is where you’ll paste the code I provide. Make sure to remove any existing code first.
Copy Appscript Code From Here 👇
    function generateScreenshots() {
      const sheetName = "Screenshot Automation";
      const apiKey = "Add Your API Key";
      const endpoint = "https://api.capturekit.dev/v1/capture";
      const format = "png";
      const fullPage = "true";
      const removeCookieBanners = "true";
      const removeAds = "true";
      const waitUntil = "load";

      const ss = SpreadsheetApp.getActiveSpreadsheet();
      const sheet = ss.getSheetByName(sheetName);
      const data = sheet.getRange(2, 1, sheet.getLastRow() - 1, 2).getValues();

<!---->

      for (let i = 0; i < data.length; i++) {
        const url = data[i][0];
        if (!url || data[i][1]) continue; // Skip if no URL or already processed

<!---->

        const encodedUrl = encodeURIComponent(url);
        const apiUrl = `${endpoint}?x_api_key=${apiKey}&url=${encodedUrl}&full_page=${fullPage}&format=${format}&remove_cookie_banners=${removeCookieBanners}&remove_ads=${removeAds}&wait_until=${waitUntil}`;

<!---->

        try {
          // Fetch PNG from API
          const response = UrlFetchApp.fetch(apiUrl, { muteHttpExceptions: true });

<!---->

          // Save PNG to Google Drive
          const blob = response.getBlob().setName(
            url.replace(/https?:\/\//, '').replace(/[^\w]/g, '_') + ".png"
          );
          const file = DriveApp.createFile(blob);
          // Make it shareable
          file.setSharing(DriveApp.Access.ANYONE_WITH_LINK, DriveApp.Permission.VIEW);

<!---->

          // Write shareable Drive URL to sheet
          sheet.getRange(i + 2, 2).setValue(file.getUrl());

<!---->

          // Pause to avoid rate limits
          Utilities.sleep(1200);

<!---->

        } catch (e) {
          sheet.getRange(i + 2, 2).setValue("Error: " + e.message);
        }
      }
    }
Note: - With this app script, we are saving all the screenshots to our drive, if you want a public URL of the screenshot you can use s3_url to true. You can read more about what other parameters you can use in the documentation here.
Once you’ve pasted the script, make these changes:
-
Tab Name: The default is “Screenshot Automation” If you used a different tab name in your sheet, update it in the code to match.
-
API Key: Where you see “Add Your API Key” swap that out for the key you got from your Capturekit account.
Once that’s done:
-
Hit Save.
-
Run the script.
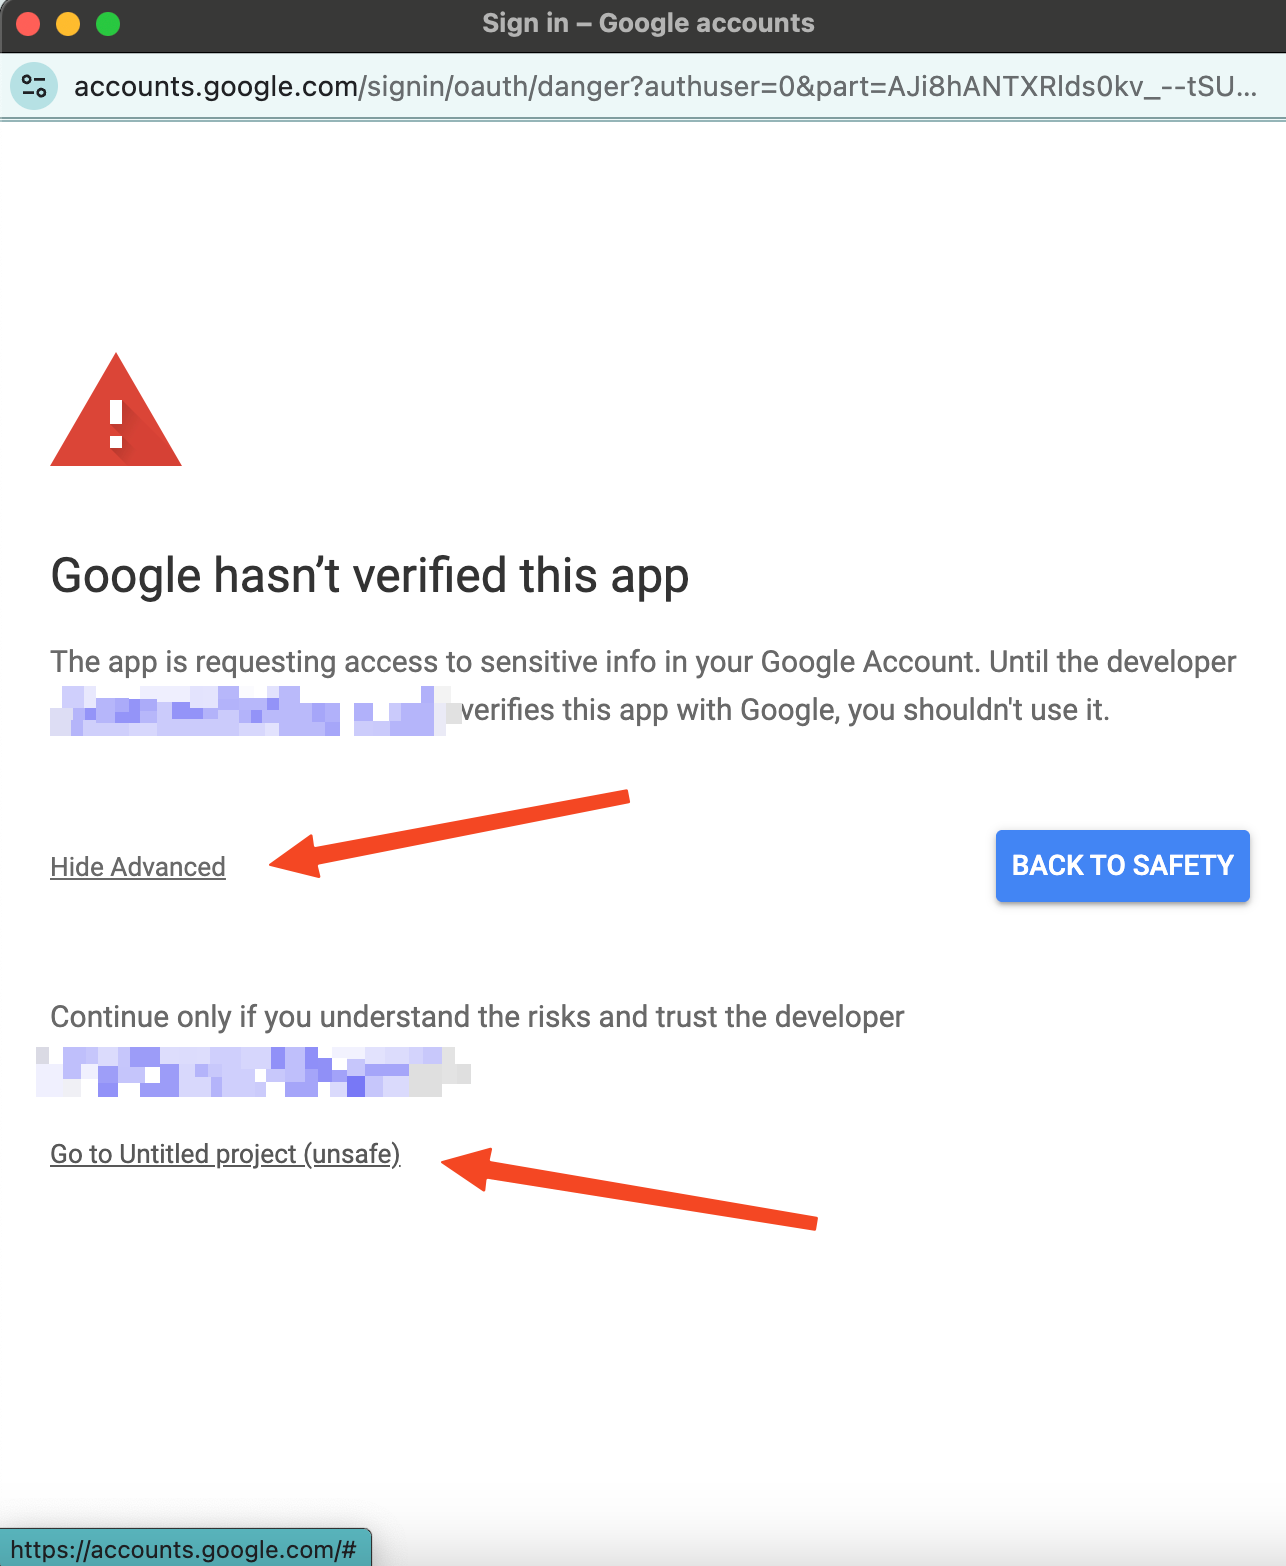
If you would be running this script for the first time, the spreadsheet could ask you for some permissions.
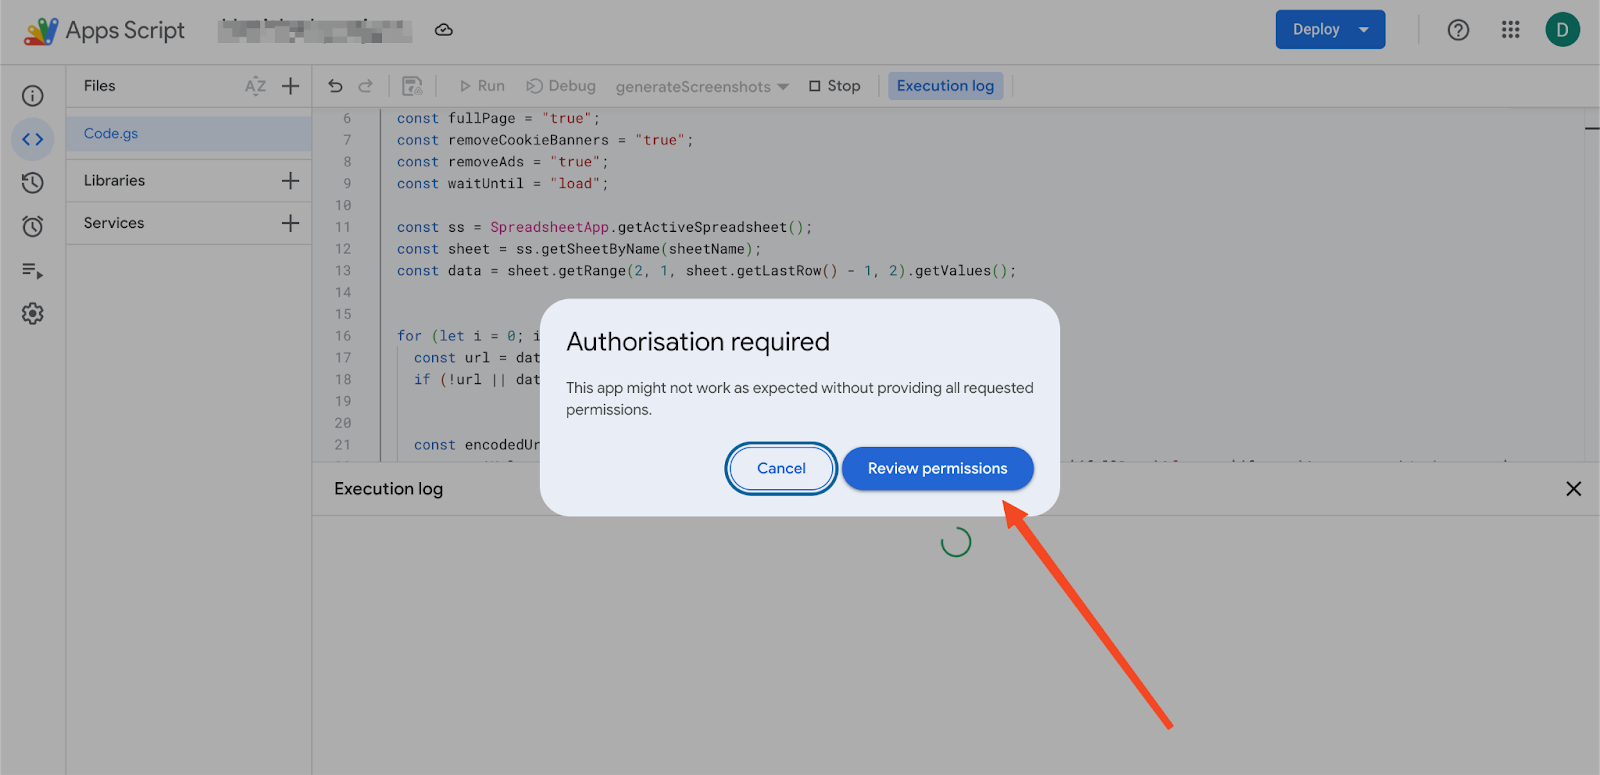
Click Review permissions
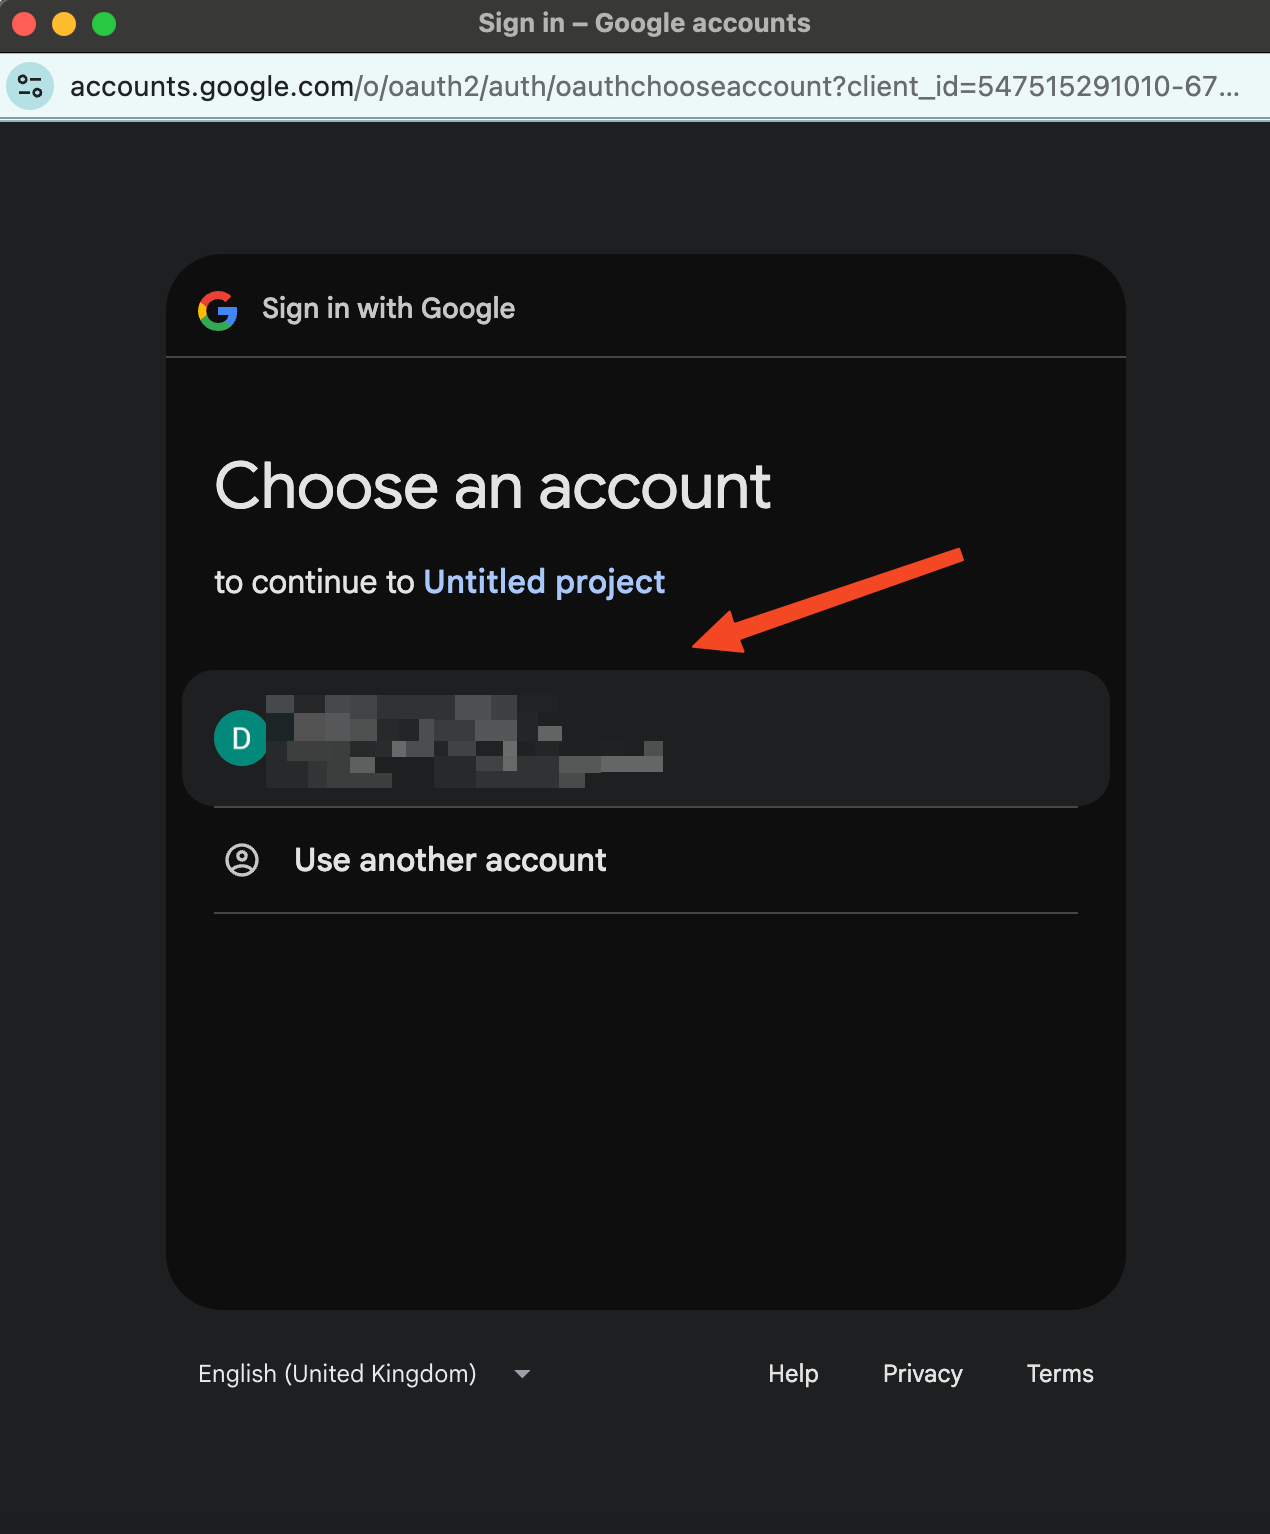
Select the account. Click & then Go To Untitled project (unsafe) as shown in the arrows below
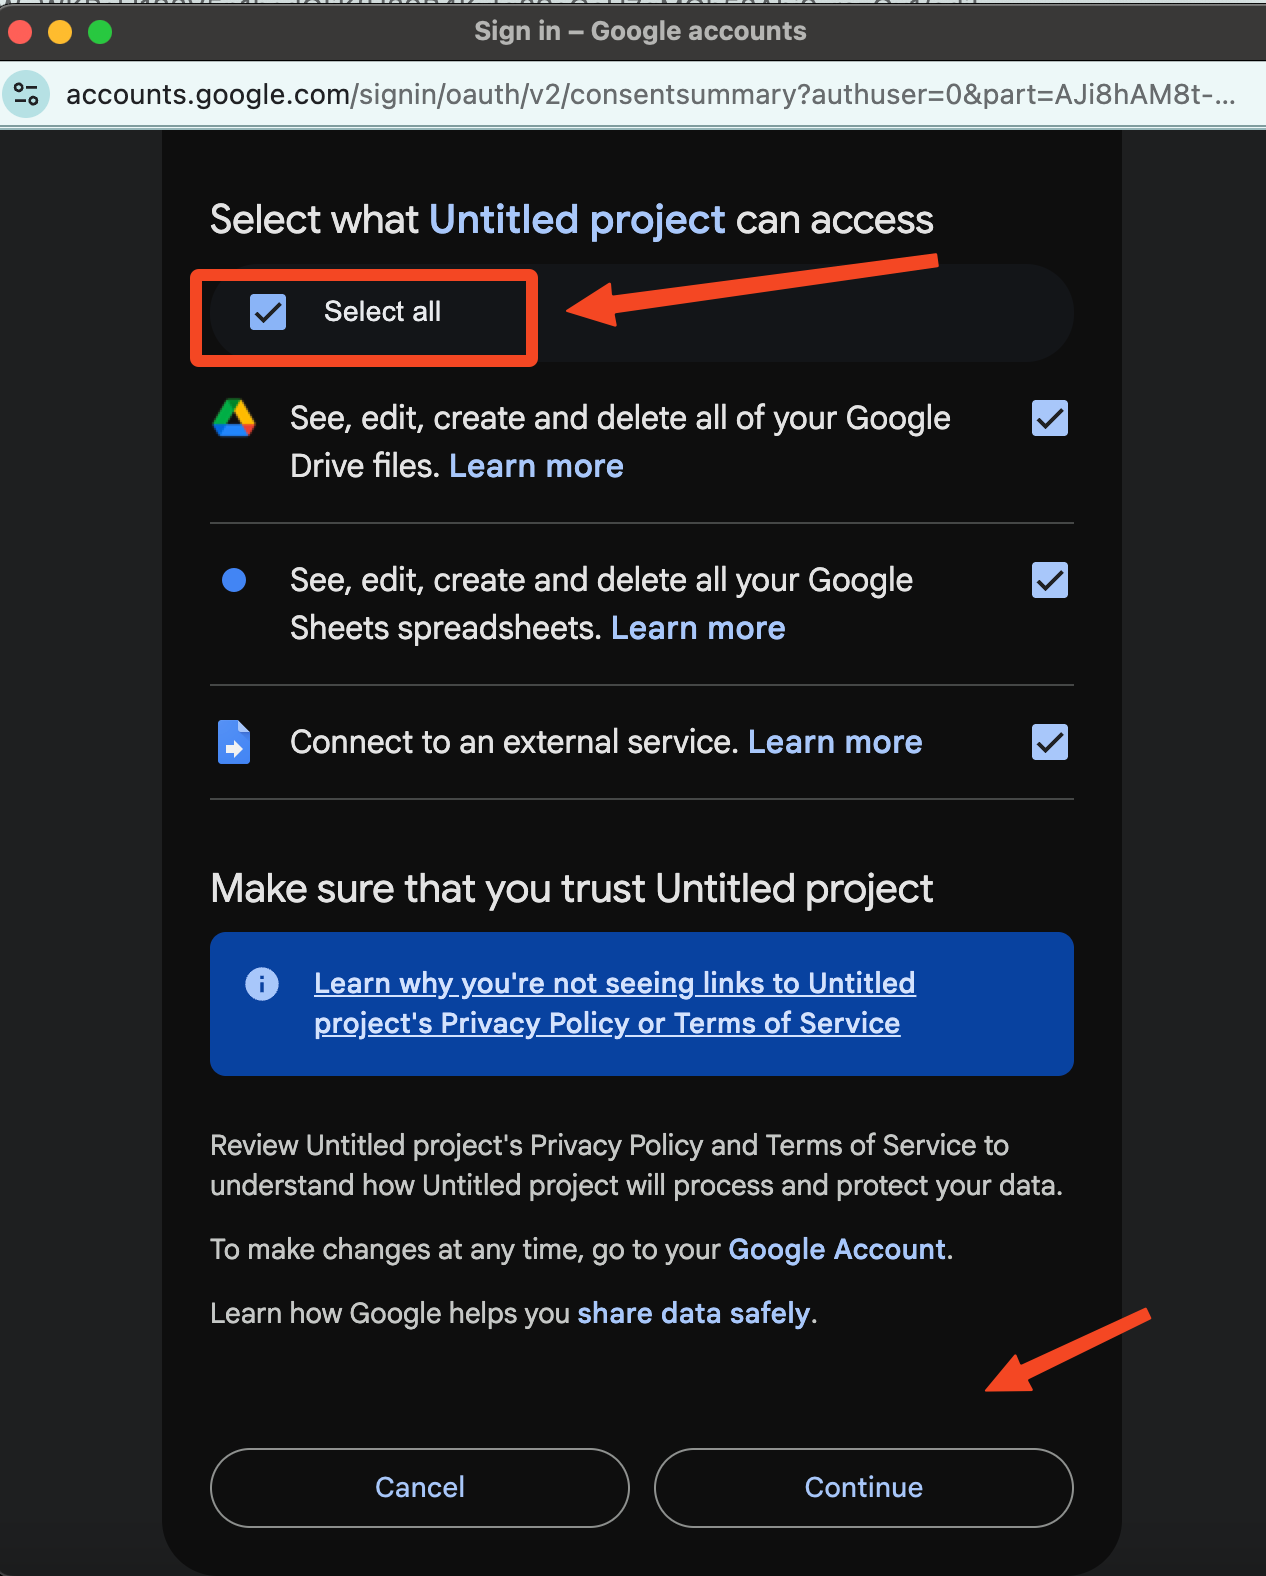
And now give access by selecting “select all” & then continue.
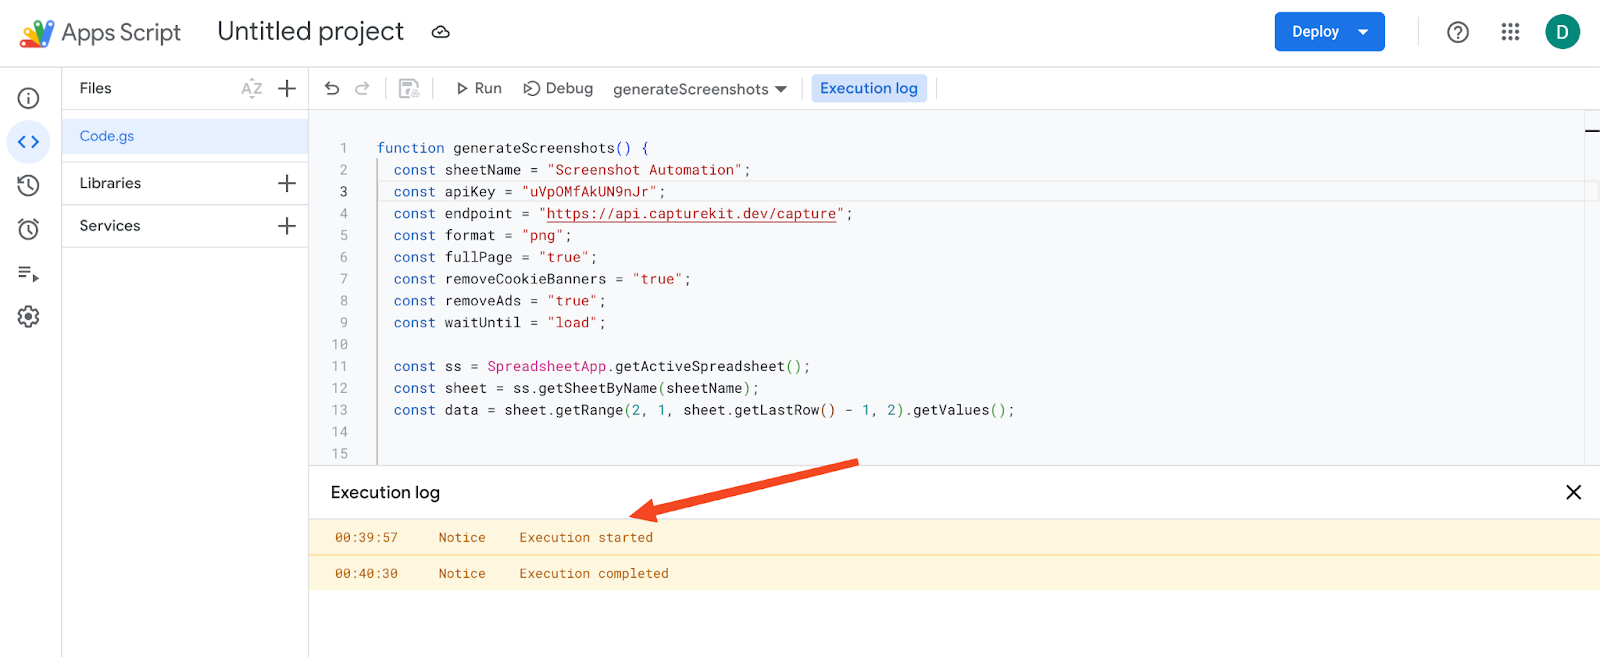
You would now notice that execution has started, and it will be completed within minutes, see the screenshot below 🙂
Step 4: Now, Check Your Screenshot Tab in Your Google Sheets
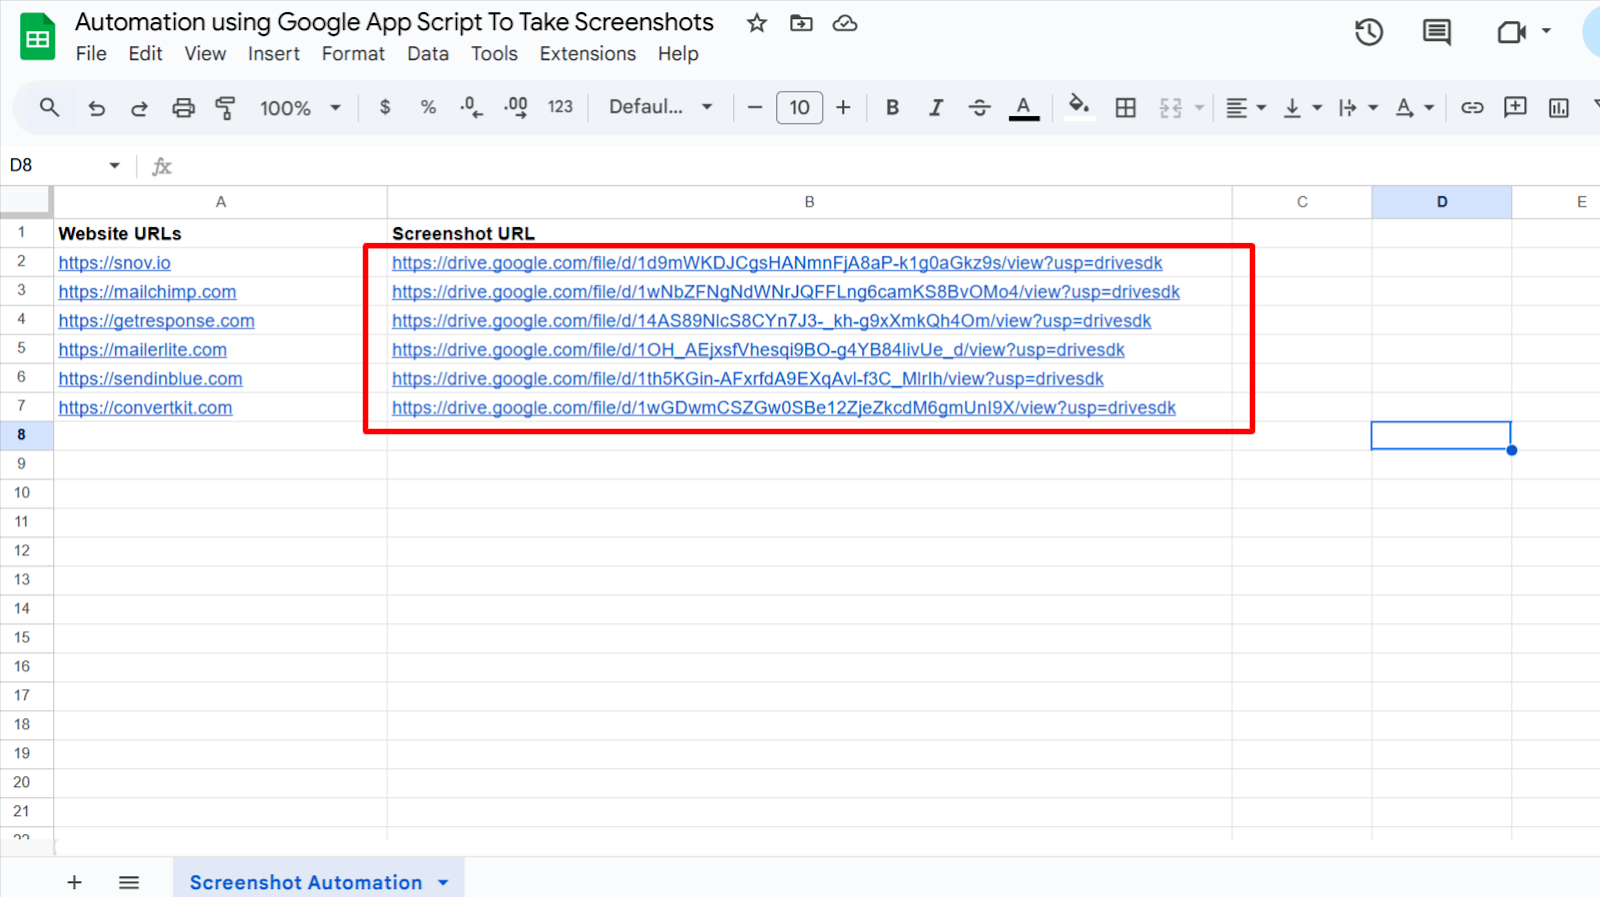
Here comes the good part. If everything’s set up right, you’ll see the screenshot links appear in your Google Sheet, right next to the original URLs in the same tab you used earlier. Click any link to check your screenshots.
Download The Blueprint
No need to set up everything from scratch. Just grab this ready-made template, add your API key where it says “Add Your API Key” and paste in your URLs. That’s all it takes to get started.
And as promised above, here is the blueprint for the Google Sheets.
Note that you will need to give permissions as shown in the screenshots above in this article, when using the spreadsheet for the first time.
Swap in your details and you’re good to go.
Wrap Up
So now you’ve got your screenshots sorted and automation working. Easy, wasn’t it? Ready to get started? Sign up for Capturekit, bring your ideas to life, and turn any website into your own visual record.
For more tips and tricks, check out these tutorials below. There’s plenty more you can do, and these guides will help you take things further:
Ready to get started with CaptureKit?
Start capturing screenshots and extracting content today. Get started for free.
Get StartedYou Might Also Like
How to Extract All Links from a Domain
Learn how to extract all links from a domain's website using Node.js.
How To Take Screenshot of All The URLs of A Domain
Automatically capture screenshots of every URL on a domain from one seed URL. Step-by-step automation for fast website audits and visual archives.
Website Screenshots for Paperclip AI Companies
Learn how to use CaptureKit Screenshot API with Paperclip to automate website screenshots across your AI agent workforce for monitoring, reporting, and lead generation.